
Hello everyone!
When I started my blog, Decorate & More with Tip, my intentions were to share with you how you can decorate your home on a budget. How am I doing? Have I given you some good budget friendly inspiration?
Today’s blog I want to continue sharing with you. I have been eyeing these Pier 1 pleated charger mats for some time now. They cost about $6.00 each. I think they would look so pretty on a table don’t you? Here is the inspirational photo of the Pier 1 mat.

I thought I could save a bunch of money if I made them myself. Here is how I made the mats just in case you love them as much as I do and want to make them for yourself.
Material I am using. (making 4 charger mats)
- 4 old placemats (you could use any type of material or even the Dollar Tree circle mats).
- 4 rolls of the wired burlap ribbon from the Dollar Tree.
- scissors
- sewing machine
- straight pins
- ruler
Let’s get started!
I had these placemats for years. It just so happens they match the burlap ribbon perfectly.
Making the base of the mat
- I turned a dinner plate upside down on the mat

- trace around the plate

- cut the pattern out

I did this to all 4 mats. I placed them to the side for now.
Pleating the ribbon.
- Take a ruler and one roll of the wired burlap ribbon.

- Place your ruler on the ribbon and fold the ribbon over the width of the ruler.

- Fold back the edge making a half fold.

- Taking the other side of the ribbon folding over the ruler.

- Fold back to make a half fold.

- Remove the ruler.

- Turn the pleat over.
")
")
- Place the ruler under the fold of the first pleat.

- Take the left side ribbon and bring it over and fold in half like before.

- Turn over and repeat the steps until you are done with the whole roll of ribbon.
I did this to all 4 rolls of ribbon.

I grabbed my sewing machine and did a zigzag stitch all around the circle place mat.

Using straight pins I pinned the pleated ribbon to the circle mat.

I cut the excess ribbon off.


Stitched the ribbon to the circle.

I did this to all 4 mats.
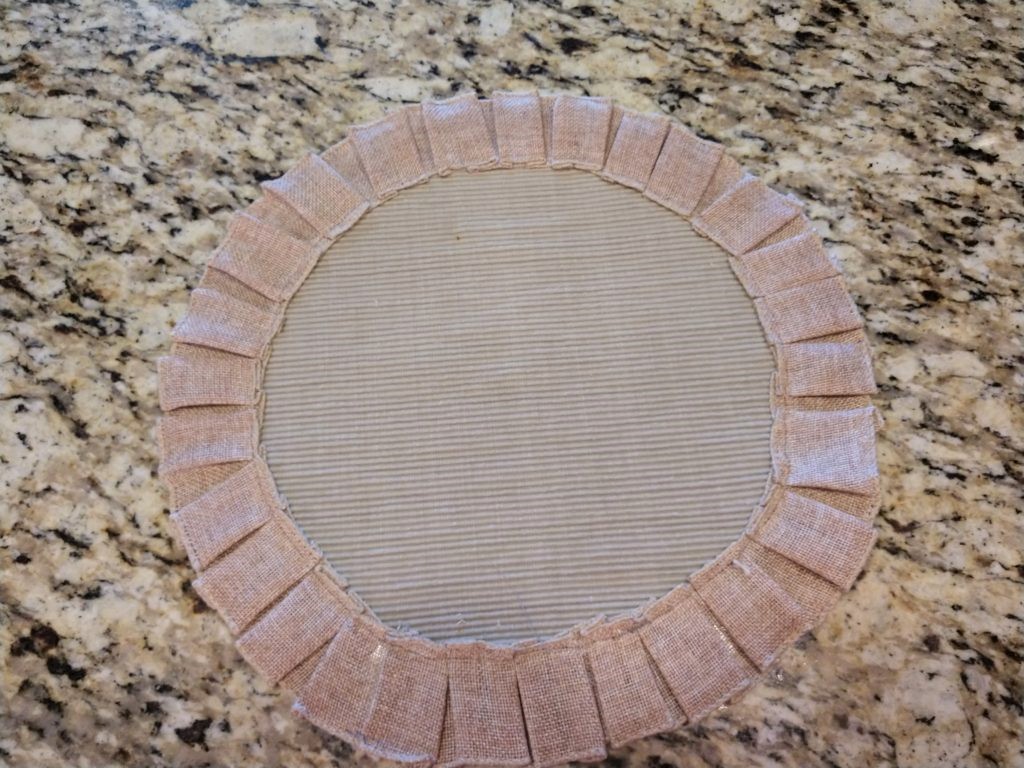
Here is my finished pleated charger mat.

Here is the Pier 1 pleated charger mat.

The total cost for my pleated charger mat was $1.00 each. I only had to buy the ribbon. The Pier 1 mat would of been $24 for 4. I paid $4.00 for all 4. I am so thrilled that I saved $20.00.
They look great and exactly the look I was hoping for.


What do you think?
Thanks for stopping by and I hope I have inspired you to make some of these Pier 1 knock offs for a table you will be styling.
As always follow me on Instagram and Facebook. And jump over on Pinterest and see what all I pin. You can PIN this blog to your Pinterest board by simply clicking on the Pinterest button below! If you like this blog please click on the LIKE Button! AND if you really like it SHARE it. I would really appreciate that so much!
Stay strong and stay blessed!
XO Terrie
Decorating our home on a budget is my thrill. I think a home can look beautiful without breaking the bank. Your home should bring the best out of you and make you feel happy. You should smile every time you enter your home. 🙂
do you make these for people i have terminal long cancer bed ridden want 6 navy blue ones my charger is 13 inch and white the navy blue is pretty
Hey Diane! I am sorry I don’t sell them, but I did find a site that sells them. Thanks for stopping by, I will say a prayer for you!
https://www.etsy.com/listing/161265272/chocolate-brown-burlap-placemats-round?ref=nla_sfs-2
This is great and so simple-however time consuming- I am retired so the time should not be a problemLOL-will keep following you after this.
Thank you Melody! It truly wasn’t time consuming. I first painted while it was drying I cut out the lemons. Then pasted. It took all about an hour. The only thing, to me took more time was taking the pictures and writing up the steps. ha! But…I enjoy doing stuff like this so it flies by when I am working on a craft. Glad you are enjoying my inspirations. That is what I want! Thanks again!
Good morning , Terrie :
Another great project of yours !! You are amazing. Is there anything you can’t do ? Those are so pretty, looks like you !!
Have a great day. Love you !!
Hello my sweet lady! I am sure there are a lot of things I can’t do but I try to do most things. If I fail I know I can’t do it. ha! I love doing projects and saving money. This was so easy and I really loved those placemats but didn’t want to spend that much for them so I did what I do best. Have a blessed day!