
Hello friends!
Today I want to share with you a painted buffalo plaid DIY. I am sure you have seen people do this painting technique on a wall, floor or even on a mason jar. I am going to show you my way of painting the pattern.
I was cleaning out our refrigerator and found an open bottle of wine that needed to be tossed. After dumping out the wine instead of tossing the bottle I decided to wash the bottle and paint the buffalo plaid pattern on it. So….if you are wanting to paint with me gather up you items and let’s get started!
Here are the items you will need:
- a bottle. You could use a wine bottle like I am or you can use anything type you want.
- white, grey and black paint (you don’t have to have grey, you could mix the black and white together to make your own gray paint)
- paint brushes ( I am using: 1/2 inch Waverly craft brush and a fine point Waverly brush)
- some twine
- monogram tag – Hobby Lobby HERE
- sealer

Paint your bottle all white. I painted my bottle with 3 coats of white.
Let dry.

I grabbed my mineral grey and black. I added a little black to the mineral paint to give it a darker grey.
After I got the right shade of grey, I took my brush to make the lines. Painting down a straight line starting at the neck of the bottle. I made my lines about 1/2 inch apart.


Now making the horizontal lines. I start at the neck and painted my first line all around the neck. Going 1/2 inch down and made another line.

Continue until the bottom.

Let that dry.
Outline a square with the fine point brush with the black paint where the two lines connect with each other.

I just drew the square the size of the two grey lines met. One thing about this project you don’t have to make perfect lines.
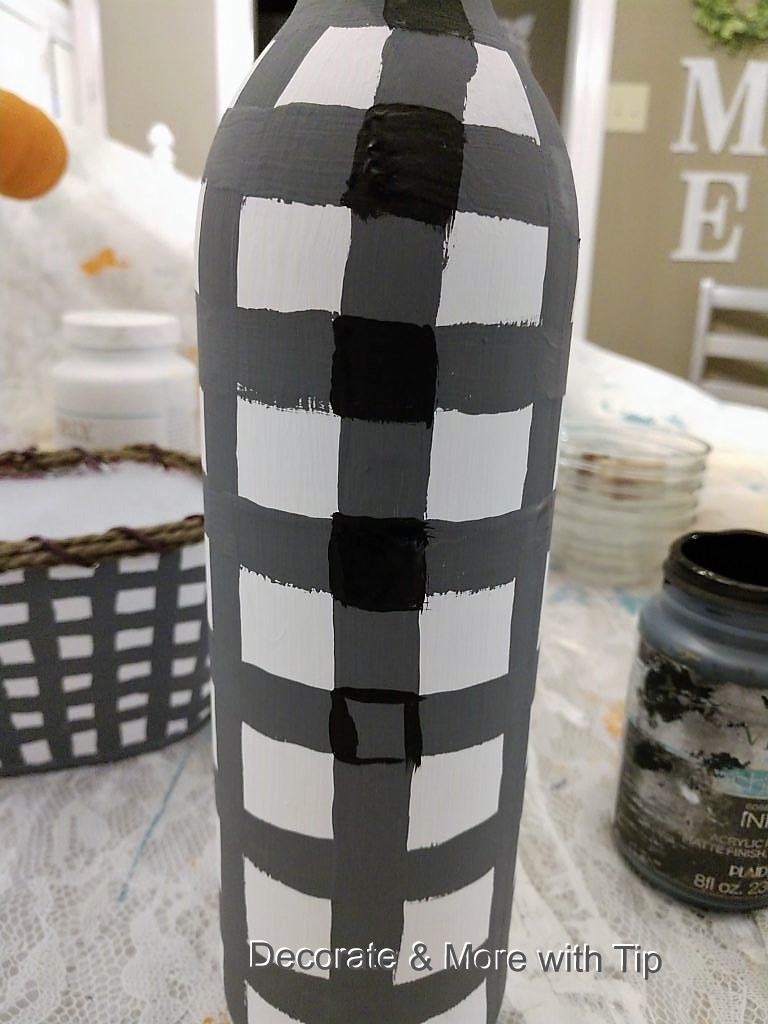
Continue to draw and color in the black squares.

Let that dry. After it dries I applied a coat of Minwax finishing wax.
I grabbed my roll of twine and wrap the neck of the bottle. I tied the starting end around the neck and started wrapping. I tied the end and tucked the end in the twine to hide.

Grabbing my T tag that I purchased at Hobby Lobby and placing it around the neck of the bottle.

Isn’t this so cute along with my DIY revamp lamp? If you haven’t seen my DIY you can go HERE to check that out.

Feel free to share my DIY. You can find more of my inspiration on Instagram or Facebook. And as always, be sure to follow Decorate and More with Tip on Pinterest and sign up for my Newsletter to receive first hand my blog updates delivered straight to your inbox!
Thank you for stopping by today!
Stay strong and stay blessed!
XO Terrie
 Copyright secured by Digiprove © 2023 Terrie
Decorating our home on a budget is my thrill. I think a home can look beautiful without breaking the bank. Your home should bring the best out of you and make you feel happy. You should smile every time you enter your home. 🙂
Love this bottle. I’m going to make one. Am soaking bottle overnight to get labels off. Thanks for info
So happy to hear you will be making a bottle for yourself. Let me know how it turns out!
This is so cute!! I saw it on IG and had no idea that you made it! Looks so good! Perfect for fall!
~Emily
Thank you Emily! Yep….that would be one of my DIYs. I made them for a facebook giveaway. I have many for myself too. So easy to make. Can’t wait to join our group for our fall home tours.