
Hoppy Thursday! 🙂 I am kicking off my Easter blogging season today. I have so many Easter projects I want to share with you, I need to start now so we will be ready to decorate. I hope you enjoy viewing them as I did creating them.
Monday, I am in not one, but TWO Pinterest Challenges! 🙄 I didn’t know they were both scheduled for the same day, it is what it is and you guessed it….I LOVE IT!!!! So come back Monday where I can double your inspiration. 🙂 One post will be Easter and the other one is a different kind of DIY. Can’t wait to share both of them with you.
Ok… back to my DIY for today! Even though my yard still has it’s winter coat of yuck, it’s not green nor does it have colorful flowers blooming, I still need to get prepared for my Easter decorations. You have to get things bought, made and planned out for the big decorating event, right?
Today, I am sharing how you can make an easy bunny garden flag for your very own. For the friends who would rather buy one than make one, you can check out ETSY’s Bunny flags they have tons for you to look at. But, for those of you who want to make one with me, here is what you need.
This post may contain affiliate links. Click {{HERE}} for full disclosure.
- 12″ x 36″ piece of burlap – BURLAP
- sewing machine or hot glue gun and glue sticks
- 5 plastic grocery bags
- yarn
- needle and thread
- scissors
- two different size bowls
- paper for the bunny ear pattern
- chalk
- pen and ruler
Let’s get started!
I am using the burlap that I had left over from another project. I measured and cut it to the size of 12″ x 36″. How I made the basic garden flag you can check out my tutorial DIY GARDEN FLAG. You will find another cute and easy garden flag for you to make there as well.
Now, I have my basic flag cut and the rod pocket is sewn, I am ready to make the bunny.
For the bunny’s body I am using two different size bowls. [You can use anything round or you can free-hand two circles].

Making the larger circle first I placed the larger bowl at the bottom and trace around with chalk.


Taking the smaller bowl overlapping the bottom circle just a little at the top. Trace around the smaller bowl stopping at the bottom circle line.

I measured from the top of the small circle to the top of the flag. Mine measured 5 inches. Taking a piece of paper I measured 5 inches and made a line giving me the size I have to work with for the bunny ears.

I free-handed a bunny ear pattern out on another piece of paper. I used that template to make both ears.

I cut the pattern out and folded the ears to make sure they both were identical. Trimming off until they were.


When placing the pattern on the burlap make sure the tip of the ears are at the top of the folded pocket of the flag. (The ears will serve as the flag pocket).
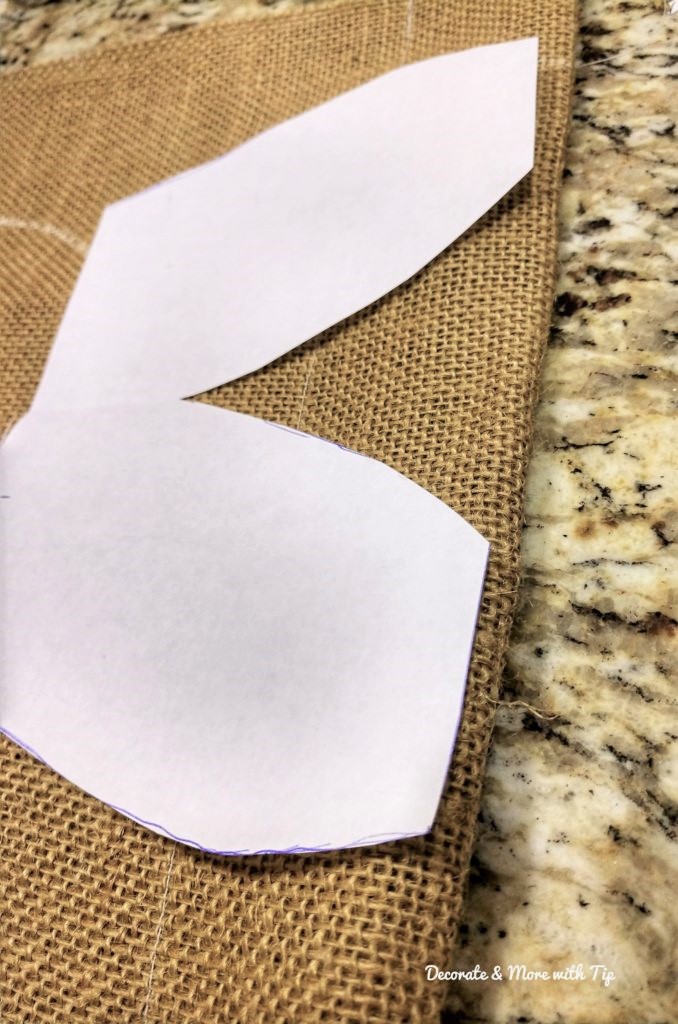
Traced around the ear pattern with chalk.

Cut on the chalk line making sure not to cut the top fold of the pocket.

I took a damp cloth and dusted the chalk lines off.

You could do three things for this next step. You can use a sewing machine like I am or hand stitch or hot glue. You will need to seal the bunny together.
I am going to do a simple stitch around the bunny shape with my sewing machine making sure to start at the seam line of the pocket. We want to keep the pocket open for the pole to slide in. Also leaving a little section opened to stuff your bunny.


Taking some plastic grocery bags and stuffing the bunny. For the ears I used one bag per ear, one for the head and two for the body.


Pin the opening to make it easy to sew. If using hot glue, apply glue.


The grocery bags gives the bunny some fluff.

To finish the edges of the bunny. Fray the edges. To fray the ends I just pulled on the loose threads. I cut the threads evenly all around the bunny.


Now let’s give the bunny his tail. I shared a tutorial on how to make pom poms. POMPOM TUTORIAL. I made two white pom poms for his tail.

I hand stitched both pompoms to each bottom sides of my bunny.

He is 18 inches long, the size of a normal garden flag. This is how he turned out. Pretty cute, don’t you think? Looking at him, you could do away with making the flag pocket and make a cute pillow accent.

On my previous garden flag blog DIY GARDEN FLAG I shared last May, I used a zip tie to secure my flag to the pole. I have a better tip to share with you today on how you can save your garden flag from blowing away. Check out this great invention!

You can find more of these little cuties over at Flag Coaster. They are easier to use, when I used zip ties, I would have to cut and paint the tie every time I changed out my garden flag. Not any longer….the coaster just slip onto the pole and that’s it! You really need to go to their store and check out all the cute coasters they have. Here is the link again Flag Coaster.com. They are running a sale right now, buy one printed coaster and get 20% off of a basic black one. (Which are the ones I am sharing today). Great deal y’all!!!
This is how they look on your flag pole. They have the cutest seasonal coasters….I am going to have to get the leaf printed coaster, it’s adorable. 🙂


![]()
⇓ PIN THIS ⇓

If you like my blog be sure to click on the LIKE button and SHARE it with your friends! It’s the best way for my blog to grow. 🙂 I would love for you to be part of my family so sign up to receive my emails. Every time I post a blog I will send you an update. Also follow me on Facebook HERE, Instagram HERE, Pinterest HERE and Bloglovin’ HERE. Come by and say Hey!
Stay strong and stay blessed!
♥ Terrie
Decorating our home on a budget is my thrill. I think a home can look beautiful without breaking the bank. Your home should bring the best out of you and make you feel happy. You should smile every time you enter your home. 🙂
Love the pom pom tail! Such a cute DIY!!
Thank you Rita! He is adorable and the tail does make him even more adorable. He will look great hanging around some pretty flowers once the weather turns warmer. Thanks for stopping by. Happy Friday my friend!